10% OFF TV Listening Systems! Use code HEARIN2024. OFFER ENDS SOON!

00 : 00 : 00

Search

OTE - 1000 SUPPORT GUIDE

Choosing the Correct TV Connection

Please identify the following connections on the back or side of your TV

Optical Audio Out / SPDIF - This connection looks like a keyed square connection covered with a plastic hinged door. A red light may emit from it when the TV is on. This is the most commonly used connection for most TVs.

-Continue to Set-up Preparations, Charging the Headphones, and follow Installation using Digital Outputs in the manual

L/R RCA Audio Out - These connections are round and colored white and red. Both these connections should be next to each other. The audio label must say “OUT” or “OUTPUT”. Identical looking connections that are labelled “IN”, “INPUT”, or not labelled will not function.

-Continue to Set-up Preparations, Charging the Headphones, and Installation using Analog Outputs in the manual

3.5mm Headphone Jack - This connection fits headphones and usually is labelled with a headphone icon. Please note that using this connection may cut audio from the TV speakers. This is a function of the TV, not our system.

-Continue to Set-up Preparations, Charging the Headphones, and Installation using Analog Outputs in the manual

The following connections will require an optional adapter to function with AudioRange systems.

6.35mm Phones -Commonly found on home theater A/V receivers, an adapter is required to step down to the common 3.5mm jack. Such an adapter can be found here https://www.amazon.com/Adapter-6-35mm-Female-Headphone-Connector/dp/B07GB5YZLL/

Coaxial Audio Out - This connection is round and is designated in orange. Due to a short industry life span and limited compatibility AudioRange systems do not support this connect out of the box. An adapter can be found here https://www.amazon.com/Optical-Converter-Bi-Directional-Repeater-ROOFULL/dp/B07D7TDXF6

HDMI (ARC) - This connection is similar to other HDMI connection but is designated as "ARC". AudioRange systems require an adapter which can be found here https://www.amazon.com/J-Tech-Digital-Extractor-Converter-JTDAT5CH/dp/B00BIQER0E/

*Incompatible Connections

L/R RCA AUDIO IN - While similar in appearance to the "L/R RCA AUDIO OUT" connection, these connections are INPUT connections designed for transmitting audio into the TV.

I've followed the instructions using the digital optical connection method but I hear no sound or only loud static in the headphones.

-Please insure that the switch on the base is in the "Optical" position.

-Your TV was not set for headphone use from the factory. Please follow the steps below to update the TV's internal audio format

*The setup menu per TV brand/ model should be similar to the following sequence.

Press the settings or menu button on the remote control. In the menu setting, choose audio settings → Additional Audio Settings → Change digital audio format to “PCM” or “Stereo” (other options such as Auto/Dolby/Bitstream/DTS will not function). Ensure selections are saved and exit the menu. Turn off the TV by unplugging the power cord for two minutes, then turn on the TV.

-For detailed instructions, click below:

Installation Videos

How to Use the OTE-1000 Wireless TV Headphone System

Troubleshooting

Technical Support & FAQs

Please identify the following connections on the back or side of your TV

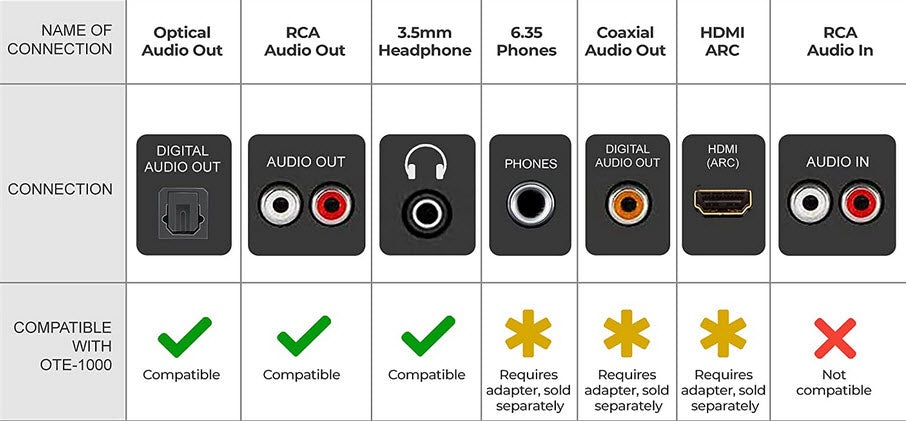
Digital Audio Out (Optical) / SPDIF - This connection looks like a keyed square connection covered with a plastic hinged door. A red light may emit from it when the TV is on.  Continue to Set-up Preparations, Charging the Headphones, and follow Installation using Digital Outputs in the manual

L/R Audio Out - These connections are round and colored white and red. Both these connections should be next to each other. The audio label must say “OUT” or “OUTPUT”. Identical looking connections that are labelled “IN”, “INPUT”, or not labelled will not function. Continue to Set-up Preparations, Charging the Headphones, and Installation using Analog Outputs in the manual

3.5mm Headphone Jack - This connection fits headphones and usually is labelled with a headphone icon. Please note that using this connection may cut audio from the TV speakers. This is a function of the TV, not our system.  Continue to Set-up Preparations, Charging the Headphones, and Installation using Analog Outputs in the manual

-Please insure that the switch on the base is in the "Optical" position.

-Your TV was not set for headphone use from the factory. Please follow the steps below to update the TV's internal audio format

*The setup menu per TV brand/ model should be similar to the following sequence.

Press the settings or menu button on the remote control. In the menu setting, choose audio settings → Additional Audio Settings → Change digital audio format to “PCM” or “Stereo” (other options such as Auto/Dolby/Bitstream/DTS will not function). Ensure selections are saved and exit the menu. Turn off the TV by unplugging the power cord for two minutes, then turn on the TV.

-For detailed instructions, click here: https://audiorange.com/pages/tv-setting-guide

Explanation: If your headphones power on and the  dock are shows a steady blue and green light, the system is operating normally. It is likely the TV is randomly cycling through different audio formats. 

Solution:  It is necessary to permanently set the audio format to the correct audio setting, "PCM".

*The setup menu per TV brand/model should be similar to the following sequence.

-Press the settings or menu button on the remote control. In the menu setting, choose audio settings → Additional Audio Settings → Change digital audio format to “PCM” or “Stereo” (other options such as Auto/Dolby/Bitstream/DTS will not function). Ensure selections are saved and exit the menu. Turn off the TV by unplugging the power cord for two minutes, then turn on the TV.

-For detailed instructions, click here: https://audiorange.com/pages/tv-setting-guide

The TV may have many round red & white connections. The connection label must say “OUT” or “OUTPUT”. Identical looking connections that are labelled “IN”, “INPUT”, or not labelled will not function. 

If the TV does not have a red & white output connection, please find the "Digital Audio Output (Optical)" connection and continue to Set-up Preparations, Charging the Headphones, and follow Installation using Digital Outputs in the user manual.

Explanation:The TV is preventing the audio from playing on the headphones and TV speakers simultaneously

Solutions:

1. If using the TV's headphone jack to connect the system, the TV is turning off the TV Speakers. This is a function of the TV, not our system. Please choose a different connection method.

2.If using the digital optical connection, you may need to select the correct sound output.

*The setup menu per TV brand/model should be similar to the following sequence.

-Press the settings or menu button on the remote control. In the menu setting, choose audio settings → sound output. Select "TV Speakers & Optical" or "TV Speakers & SPDIF"

3.Your TV may not support simultaneous audio. This may be bypassed by connecting the AudioRange system directly to the video source such as a cable or satellite box using the included red and white cable.

Explanation: The TV's analog audio out system is set in "Variable" mode, allowing the TV to control the volume of the headphones.

Solution: Press the setting or menu button your TV's remote control and navigate to Sound Options. Choose "Analog Audio Out" and change it from "Variable" to "Fixed". Now the TV will transmit full volume to the headphones. Volume on the TV  speakers and headphones can be controlled independently.

Explanation: The TV is preventing the audio from playing on the headphones and TV speakers simultaneously

Solutions:

1.If using the TV's headphone jack to connect the system, the TV is turning off the TV Speakers. This is a function of the TV, not our system. Please choose a different connection method.

2. If using the digital optical connection, you may need to select the correct sound output.

*The setup menu per TV brand/model should be similar to the following sequence.

-Press the settings or menu button on the remote control. In the menu setting, choose audio settings → sound output. Select "TV Speakers & Optical" or "TV Speakers & SPDIF"

3. Your TV may not support simultaneous audio. This may be bypassed by connecting the AudioRange system directly to the video source such as a cable or satellite box using the included red and white cable.

Explanation: Some TVs have limited number audio outputs connections.

Solutions:

1.If both your TV and Soundbar supports "HDMI (ARC)", try moving the soundbar to this connection to free the optical connection. Then use the optical connection for the AudioRange system.

2. Optical connection splitters are available to provide 2 or more optical connections. Such devices are available to your local retail store, consumer electronic store, or online retailer. Many of our customers have good experiences with this optical splitter

3.  The AudioRange system can be directly connected to the video source such as a cable or satellite box, effectively bypassing the TV's connections.

Explanation: The TV is an older TV using an Orange Digital Coaxial connection which had a short life span and limited compatibility in the electronics industry. Due to this, our AudioRange systems do not support this connect out of the box. 

Solutions: An adapter can be purchased from your local retail store, consumer electronic store, or online retailer. Many of our customers have good experiences with this adapter

Similar to any other TV accessory, the AudioRange system must be physically connected to the TV using one of the provided cables. If you are using a video device such as a cable box, satellite box, or DVD player, you may be able to bypass the TV and connect the AudioRange system directly to the source device by finding the round white and red colored connections on the rear of the box. Continue to Set-up Preparations, Charging the Headphones, and Installation using Analog Outputs, substituting the TV for the Cable/Satellite Box according to the user manual.

What the lights mean on the base:

When the headphones are off:

-Flashing orange Light - Standby mode, headphones are not placed on dock

-Solid Red Light - Headphones are placed on dock and charging

-Solid Green Light - Headphones  are placed on dock and fully charged

When the headphones are on:

-Solid Green and Blue Light - Normal operating mode, dock and headphones are wirelessly connected and functioning

-Solid Green and Orange Light -  Dock and headphones are wirelessly connected and functioning but headphones are muted. Press mute button on headphones to unmute audio

What the lights mean on the headphones:

-Solid Blue Light - Normal operating mode, dock and headphones are wirelessly connected and functioning

-Solid Red Light - Headphones are charging on the dock or by the direct charging method

-Flashing Blue Light - Headphones are connecting to dock

-Pulsating Blue Light - Headphones are in pairing mode.  Please refer to "The headphones are not connecting to the dock/base"

As with many electronic devices, the headphones' software may be frozen. To force the headphones to reset, find the headphone jack cable included in the box and plug it into the headphone jack located on the bottom of the headphones.  Remove the cable and the headphones should operate as normal.

1.The headphones may be full depleted of battery power.  Place the headphones on the dock to charge or use the direct charging method for at least 2 hours.

2.As with many electronic devices, the headphones' software may be frozen. To force the headphones to reset, find the headphone jack cable included in the box and plug it into the headphone jack located on the bottom of the headphones.  Remove the cable and the headphones should operate as normal.

The AudioRange system may take a few moments to function as it establishes static and interference free audio.

In the unlikely event that the headphones are on and a flashing orange light is present rather than a solid green and blue light, the headphones have become disassociated with the dock. To re-pair the system follow the steps below.

1.With both the dock and headphones powered on, press the mute button on the headphones for 3-5 seconds and let go. The light on the headphones will pulsate blue.

2.Locate the black button on the bottom of the dock and press it for 3-5 seconds and let go.

3.A solid green and blue light should now be present on the dock and the system should now operate normally.

*The steps above should be done within 15 seconds, otherwise the re-pairing process will fail.

Search